Contract Management
Contract manager gives you a digital place to store your agreements you have with your customers. It could be as simple as defining a start/end date for an antivirus subscription or as complex as a managed service contract with defined product discounts and service level agreements.
What it Does
- Allows you to create contracts that can be attached to SLA's
- Gives you a place to attach signed copies of agreements you might have
- Tracks start/end dates, notes, etc for your sales people
- Allows for defining an SLA to apply to a customer
- Allows for defining price overrides for any products/services you sell
- Add reminders, assign a technician, and send emails directly to client from contract
- Get notified when agreement is getting close to due date
- Can automatically stop recurring invoices at the end date if you attach them
What it Doesn't Do
- Electronic document signing
Table of Contents
Tour
Clone Contracts
Contract Pricing
Product Blocklist
Service Level Agreements (SLAs)
Create or Edit SLAs
Tour
To create a contract head over to Customer's tab, select "Customer's Module" and then select "Contract Manager"

Select the green "New Contract" button to start a new Customer Contract.

You will then see the screen below. Customer name will auto-populate as you type. From there you will want to name the contract, give it an estimated, likelihood it will close, start and end date, the primary contact, and description. If there is an SLA agreement in place select the dropdown and select the agreement you would like to add.
Select the checkbox if you want the contract to apply to all tickets including existing ones. Leave it unchecked if you only want the contract to apply to tickets going forward.
Then select orange "create contract" button to complete the process.

You will then be brought to the screen below. You can add attachments, reminders, or send out an email via the box highlighted below.
You can also change the contract details at any point by clicking on the options within the white box underneath the "Contract" box or the blue "edit" button on the top right.

Clone Contracts
It is now possible to clone contracts for fast Contract generation.
(Recommended: Take some time to create Contract templates for your various service offerings. That way when you sign/sell a contract you can quickly pull up the template and clone away)

Next search your customer
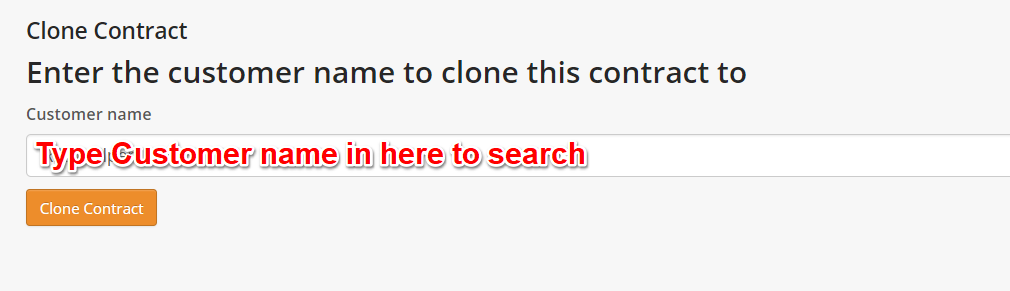
That's it!
Contract Pricing
This will allow you to set special rates for customers on any items within your inventory, including labor.
Simply search for an item by typing the "product's name". The name and original price will auto-populate the fields. You can then change the price under "Contract Price(override)", from there click on "add override".

When you go to an invoice and add the line item to an invoice, it will automatically apply the discount!

Important Note: Once a contract rate is created it will override any manual changes made within the "Add/view charges" module. If you change or add a contract, only line items added after that change will be affected. Previously added line items would still be at the settings that were in effect when they were added.
Product Blocklist
You can add products to this field to prevent the selling of products to the customer attached to the Contract. This way someone doesn't accidentally add the wrong product!

Service Level Agreements
You can attach SLA's to your Contracts which are then applied to Tickets when they are generated for your customers. This enables you to then ensure Time to Contact and Time to Resolution for your clients. It also provides some alerting so that you know when Tickets are opened for contracted clients along with some other options.
Start by heading to the Contact Index page and clicking the SLA button in the upper right.

On the next screen you can create or manage existing SLA settings with a selection of options.

Creating New SLAS or Editing Existing SLAs
Clicking either New SLA or the edit button on an existing SLA will present a pop up with some settings to be used with the SLA to make it work how you'd prefer.

Time To Response - The time in minutes, hours or days between when the ticket is created and a tech replies using a Public Comment on a ticket. AutoResponders don't count!
Time to Resolution - The time in minutes, hours or days between the time a ticket is created and the ticket status of the ticket is set to Resolved.
SLA Breach Warning - The time in minutes, hours or days that the system will warn you that the ticket is approaching both of the above. This setting is tied to Notification Center Alerts for your team. Make sure these are active in the Notification Center!
Your SLA Schedule - Toggle if you want the SLA to use your set Business Hours or if you want to set a custom hours rule to follow
Head to the Business Hours KB for more info.

Pause countdown for select ticket statuses - Choose to pause the SLA timer on a ticket if certain Ticket Statuses are used on the Ticket
Assign to Tech - Automatically assign a specific tech to tickets with this SLA
Re-Assign to Tech if breached - Change the Ticket assignment if the SLA is breached.
Set Priority - Set the priority level of the ticket automatically.